Half term has finished but I've been ill with the flu so I've only just come back to school yesterday. However, I got stuck straight in as I uploaded the footage that hadn't been uploaded from the tape.
Today, I made the bridge whilst in class. I put the pan shot across instead of quick shots because I thought this was the most effective as it was the nicest shot. Also, it was a good shot to add the 'blur' effect in, which I put in to make it look like a dream.
Then, in my double free, I came up to do some more editing in which I edited the second chorus so that it lead straight on to the bridge so therefore, a nice chunk of the video was complete.
In the left over time, I started on the first chorus. I wanted to make sure I hadn't used the same shots for both the chorus's because they're both of the artist performing. However, I didn't finish this, just a start.
Thursday, 3 March 2011

Saturday, 19 February 2011
How I Made My Album Backing

It started with just this image:
I thought this would be a suitable back as it is full on glitter so it's fun and girly because the front is more serious and based on this music. This is bright and reminds the audience that this artist is the best of both worlds: a serious artist (the front) but also a fun person in general.
I then cropped this image into a square and used the purple-ish side for the main image because her name is 'Violet' so it is more personal and post modern.

I then put bright pink stripes up to make the image look more abstract, also pink clashes with purple so creates an 'i don't care' attitude, like rebellious from social norms as these colours wouldn't usually be put together. I put a box on the side so I had a layout of space where I could put the track names, I did it slanted so nothing on the album is 'straight'. It has also been made half transparent so it doesn't block off the glitter completely.
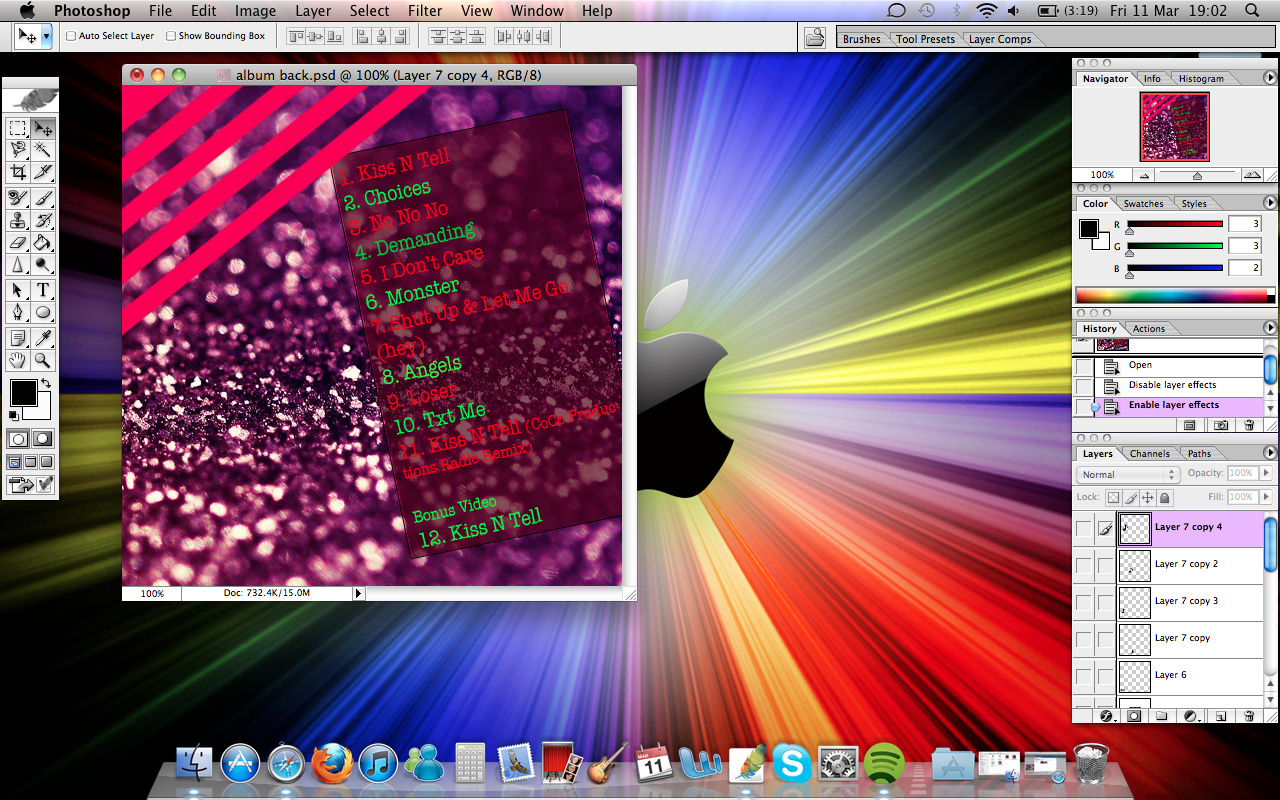
At this point, I put the track names in. I put them with different colours so that it wasn't boring however, they're still easy to see and do not clash too much with the background due to the box around it. I used neon green and neon pink because they clash with each other which fits the theme of the backing.
I realised that on other album cover backings, they have their production company and a logo for it, so I quickly made a rough logo on Photoshop:

And I downloaded a barcode and also a few music notes to remind the audience that although the artist is fun, she find her music very important and not just in it for the fame. This was the finished result:

Friday, 18 February 2011
How I Made My Album Cover
 This was the initial image. I then cropped it so that it was a square shape and took some of the colour out using the software: iPhoto.
 This was the outcome. I then imported it to Photoshop to edit out the cupboard. I used the stamp tool to copy the wallpaper where the cupboard was. This was a very conventional pop album cover as it is just a close up image of the artists face.
I then did the album name and artist name using fonts from Dafont.com. I edited the colour of these by putting patterns in the artist name and embossing the album name.
To make the album more personal instead of too conventional, I searched online for an image of lips to resemble a kiss. I found this image to do the job: 
I then edited out the white bits to make it transparent so it looked like the kisses were from the artist straight on to the album cover and put the kisses on each side of the album name, I mirrored the image on one side to make it even, which I think is important in a successful album cover.
This was the final result after my editing:

Wednesday, 16 February 2011


Monday, 14 February 2011
Starting the Editing
Although we haven't done all the filming, I feel we have done enough to start the editing so today, I downloaded the song on to the mac, I used the specific one that we had used from my iPod so that all the lip singing would synchronise with the music.
I also have imported the clips that we have done so far which include:
- The walking down and up stairs for beginning of song
- Close up of eyes
- Bridge
- Chorus
I have also started putting this onto the time line on Final Cut so we can start the editing today.
I also have imported the clips that we have done so far which include:
- The walking down and up stairs for beginning of song
- Close up of eyes
- Bridge
- Chorus
I have also started putting this onto the time line on Final Cut so we can start the editing today.
Tuesday, 8 February 2011
Filming Chorus
Today, we filmed the chorus in the hall doing the performance part. I think this was a successful session, we spent about 2 and a half hours filming and we got most of the shots that we needed. However, I think we might need to film a bit more as we don't have enough different material as we were in a rush because we had to give back the props to the different departments before they went home.
Once we have uploaded the filming onto the timeline, we can see how much we have and how much extra we need if we do.
Once we have uploaded the filming onto the timeline, we can see how much we have and how much extra we need if we do.
Thursday, 3 February 2011
Filming for Bridge
We filmed for the bridge part of our video today, this is only a few seconds long but a key block within the video.
The shots were mainly the artist singing to the camera as it's supposed to be intimate camera work but we did also do different shots, like crawling towards to the camera just because it's quirky. I thought it would be a good idea to input quirky little shots at random intervals within the video as it breaks the conventions of a video running smoothly straight through.
The shots were mainly the artist singing to the camera as it's supposed to be intimate camera work but we did also do different shots, like crawling towards to the camera just because it's quirky. I thought it would be a good idea to input quirky little shots at random intervals within the video as it breaks the conventions of a video running smoothly straight through.
Subscribe to:
Posts (Atom)